Connection Management
Create a Connection
To create a connection, click on the + icon at the bottom left of the screen then select "Add A Gremlin Server Connection" or on the Getting Started tab, click on "Add New Connection". You will be presented with the following screen:
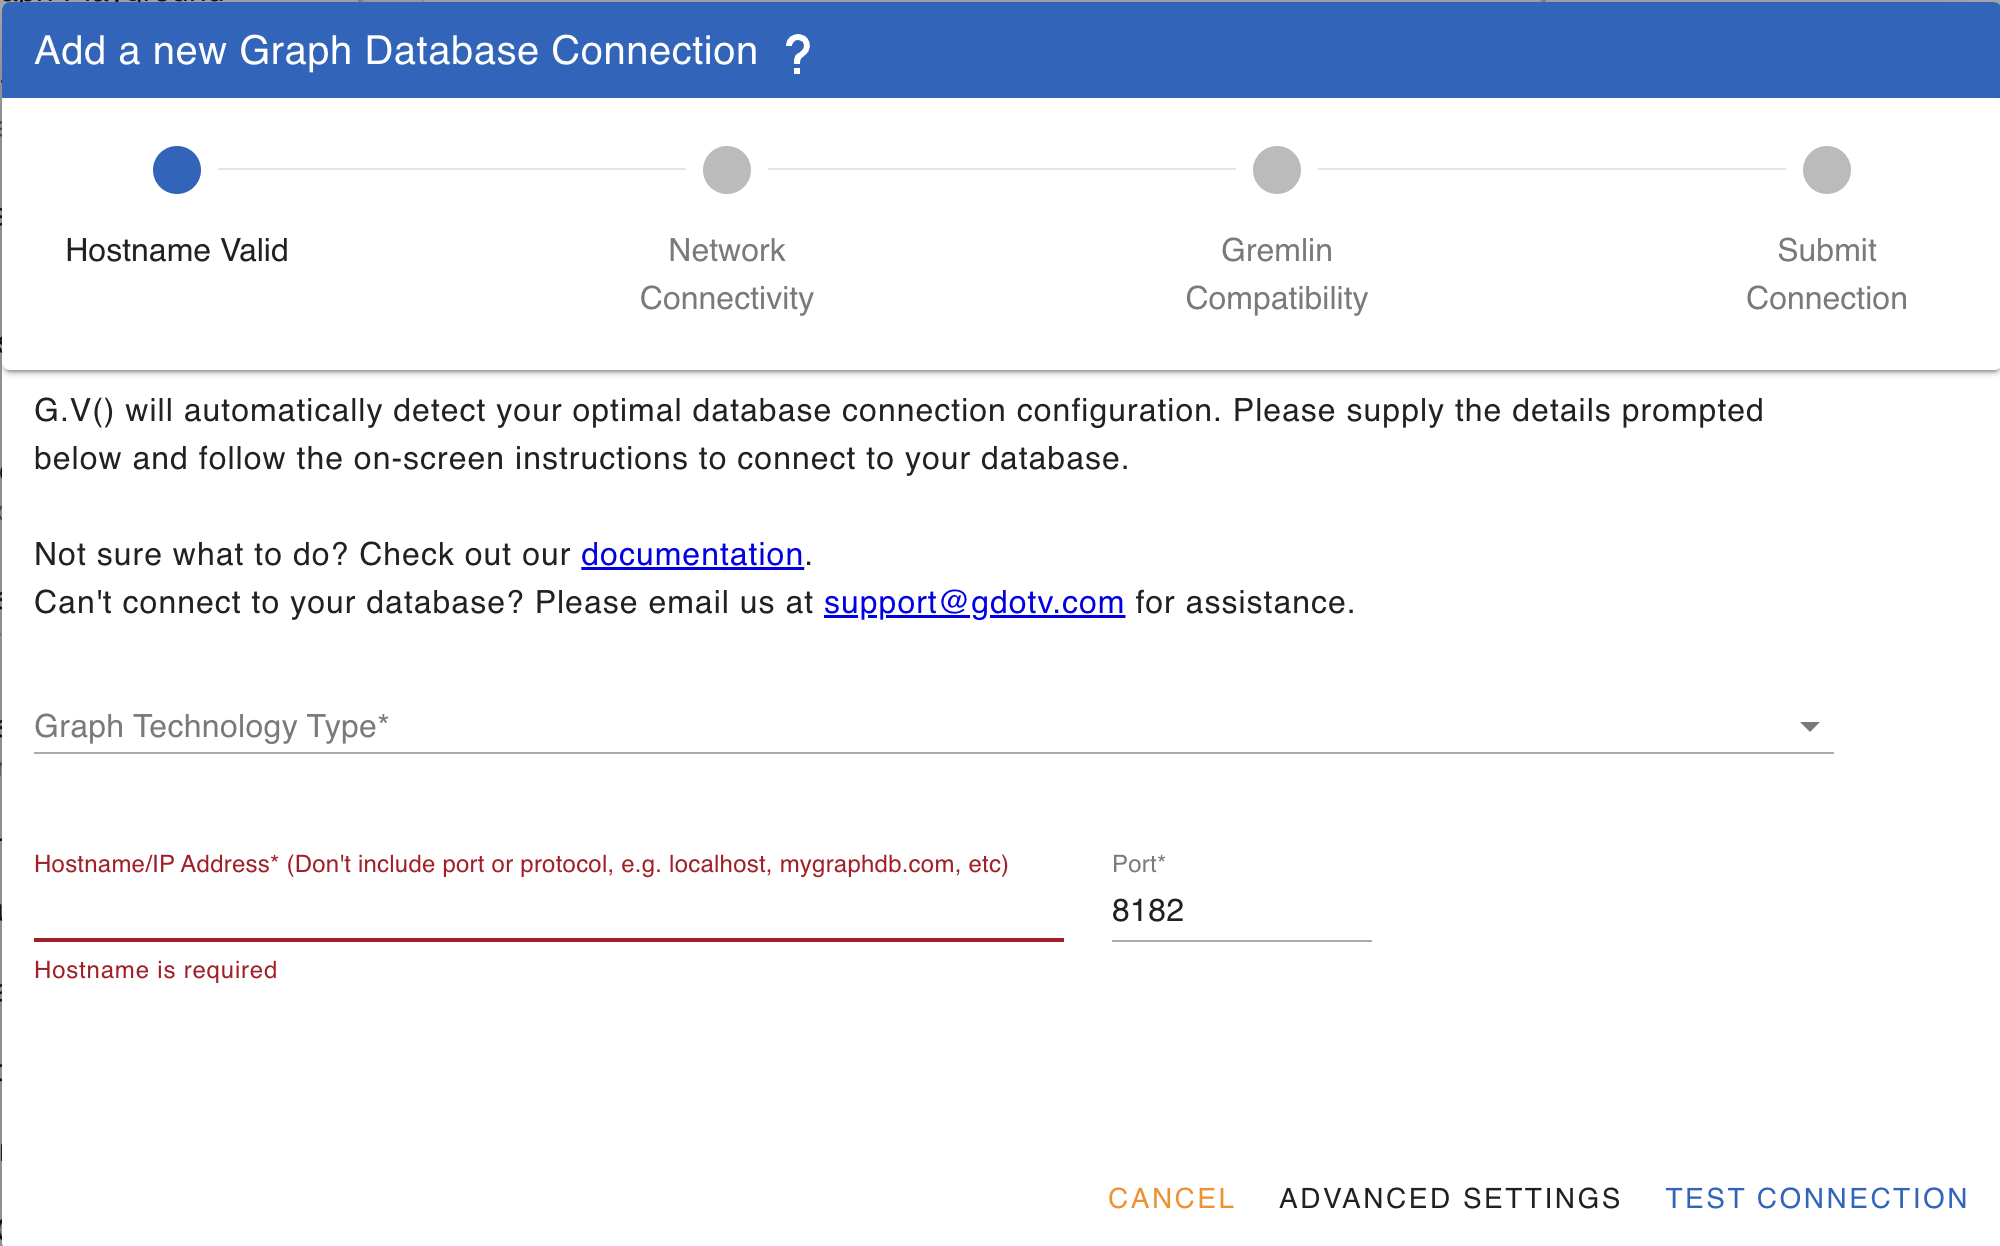
You will first be prompted for Graph Database Connection Type (e.g. JanusGraph, Amazon Neptune, etc), then a hostname and port to use to connect to your database. G.V() will attempt to connect to your database automatically and will perform a number of verifications. Should connection fail, you will be advised of next steps to take or additional values to enter, for instance credentials, AWS IAM Authentication details, or an SSL certificate.
TIP
As G.V() progresses in setting up your connection and discovers its requirements, it will display a list of steps indicating how far to go before the connection is complete. For instance, G.V() will evaluate if network connectivity to your database host can be established first, and then detect next steps such as "Provide Credentials" or "Complete SSL Configuration" as required by your database provider.
TIP
G.V() is designed to make your database connection onboarding as easy and effortless as possible. However if despite that you're struggling to connect your database using G.V(), don't hesitate to drop us an email over at support@gdotv.com, we'll be happy to assist you.
Create a Connection (Advanced Settings)
To create a connection, click on the + icon at the bottom left of the screen then select "Add A Graph Database Connection" or on the Getting Started tab, click on "Add New Connection". Then, click on "Advanced Settings". You will be presented with the following screen:

The fields are as follows:
- Connection name (Required): A friendly name for your connection, used for display purposes
- Description (Optional): A description for your connection
- Connection Color (Optional): If specified, the color associated with the connection will be displayed on Query Editor tabs to allow distinguishing them more easily. If not specified, a random color will automatically be assigned.
- Gremlin Database Variant (Required): Specify which underlying database technology is used for your server. It may be one of Gremlin Server, Amazon Neptune or Janusgraph. When specifying Amazon Neptune, additional configuration fields will be available, described Amazon Neptune Configuration Fields.
- Hostname (Required): The Hostname for your server, specified without any protocol
- Port (Required): The port number of your Gremlin Server, 8182 by default
- Use SSL (Required): If connection over SSL is required, please check this option.
- SSL Root CA Certificate (Optional): When using your connection over SSL, please supply the root CA Certificate file for your SSL certificate in .pem format. Note that the Amazon Neptune Root CA Certificate comes pre-loaded in G.V().
- Ignore SSL Validation: If SSL is enabled for your connection, allows ignoring client-side SSL warnings to connect directly without supplying a SSL Root CA Certificate
- Serializer (Required): The serializer to use with the connection. Please ensure you specify a serializer that is compatible with your Gremlin Server. If in doubt over which available serializers are available, check your Gremlin Console remote connection YAML file.
- Graph Traversal Source Name: Name of the the GraphTraversalSource object to execute queries from. Depending on the Graph Database Variant you're using this may not be necessary. Using automatic connection detection, G.V() will determine available GraphTraversalSource for your DB and offer to select one.
- Username (Optional): If credentials are required for your database, please specify a valid username
- Password (Optional): If credentials are required for your database, please specify a valid password for the username previously supplied.
- Remember Password (Optional): If credentials are required for your database, you can optionally save the password in G.V() to avoid re-entering it for each subsequent use. If disabled, you will be prompted during each G.V() session to enter the database password when attempting to write a query.
Once you have filled the required information in the form, you will be able to either test the connection by clicking on "Test Connection" or saving it by clicking "Submit".
Amazon Neptune Configuration Fields
When specifying your Gremlin Database Variant as Amazon Neptune, the following additional fields will be available:
- AWS Access Key ID (Required with Use IAM Authentication Enabled): Your AWS IAM User's Access Key ID
- AWS Access Secret Key (Required with Use IAM Authentication Enabled): Your AWS IAM User's Access Secret Key
- AWS Service Region (Required with Use IAM Authentication Enabled): Your AWS IAM User's Service Region
- Load AWS IAM Credentials via AWS CLI Profile: Enable this option to fetch your AWS IAM Credentials directly via a pre-configured AWS CLI profile. This option is required to automatically refresh credentials from a Single Sign-On enabled AWS IAM User Account. Note that G.V() will be looking for profiles in the default credentials configuration file location.
- AWS CLI Profile Name (Load AWS IAM Credentials via AWS CLI Profile): The name of the AWS IAM CLI profile to fetch AWS IAM Credentials from.
- Use AWS Temporary Credentials: If you intend to connect to Amazon Neptune using Temporary Security Credentials, please check this option to be prompted for your session token
- ARN Role To Assume (Required with Use AWS Temporary Credentials): AWS ARN Role to Assume using the Access Key ID/Access Secret Key/Service Region to generate STS token under the role specified when connecting to the Neptune database. This can allow for instance to run queries that interact with other AWS services, e.g. OpenSearch for FTS queries.
- Use Proxy: If you are connecting to your Amazon Neptune behind a manually configured Nginx or HAProxy proxy, and you are using IAM credentials, check this option to enter your Amazon Neptune endpoint hostname. This is required for IAM DB authentication as requests to Amazon Neptune must be signed with a host header containing the actual Amazon Neptune endpoint rather than the proxy hostname.
- Amazon Neptune Hostname (Required with Use Proxy): If use Proxy is enabled, enter your Amazon Neptune hostname behind your proxy configuration here (e.g. database-1.cluster-cnwch6byw8sx.eu-west-2.neptune.amazonaws.com)
- I want to specify a Session Token directly (Optional with Use AWS Temporary Credentials): If you enable this, you will be prompted for a Session Token that you can input directly as opposed to generating AWS Temporary Credentials via an ARN Role To Assume.
- AWS Session Token (Required with I want to specify a Session Token directly): The temporary AWS Session Token to use to connect to your database. Note that the token will need to match the AWS Access Key ID/Secret Key generated alongside the generated temporary session token and will need to be refreshed manually when the credentials expire.
TIP
If your Amazon Neptune Database requires the use of AWS IAM credentials, G.V() will automatically detect it and attempt to load existing credentials via the DefaultAWSCredentialsProviderChain as described in Provide temporary credentials to the AWS SDK for Java
You can also specify a different AWS CLI profile to fetch credentials from, including (but not limited to) Single Sign-On profiles to automatically refresh credentials.
Establishing Connectivity to your Amazon Neptune Database
Your Amazon Neptune Database is hosted in a privately hosted VPC (Virtual Private Cloud) which is not normally accessible except by machines within that same VPC. Additionally, machines within the same VPC as your Amazon Neptune cluster need to be allowed to connect on port 8182.
G.V() comes bundled with the SFSRootCAG2 Root certificate required to securely connect over SSL with Neptune.
For guidance on how to configure an SSH tunnel to your Amazon Neptune Database, please refer to sections 1 and 2 of https://github.com/aws/graph-notebook/tree/main/additional-databases/neptune G.V() is also compatible with connecting to Amazon Neptune in the following ways:
- Via a manually configured nginx or haproxy proxy
- Via AWS VPN
- Via AWS Application or Network Load Balancer
- Via direct connectivity from the Amazon Neptune VPC or from a VPC linked to your Amazon Neptune VPC
I'm getting a "hostname could be found but connection timed out" error
G.V() has a 30 seconds timeout when attempting to connect to your database. Very often with Amazon Neptune a connection timeout if you're using an SSH tunnel through to Amazon Neptune, it can indicate two things:
- The SSH tunnel itself is not open
- The SSH tunnel to your EC2 instance is open but your EC2 instance cannot connect to your Amazon Neptune cluster, usually due to Security Group/Networking restrictions.
A useful test to confirm your Amazon Neptune cluster is reachable from your device is to open a browser and navigate to:
https://YourNeptuneEndpoint:8182/status
You should see a report, similar to the one below, indicating the status and details of your specific cluster:
{
  "status": "healthy",
  "startTime": "Wed Nov 04 23:24:44 UTC 2020",
  "dbEngineVersion": "1.0.3.0.R1",
  "role": "writer",
  "gremlin": {
    "version": "tinkerpop-3.4.3"
  },
  "sparql": {
    "version": "sparql-1.1"
  },
  "labMode": {
    "ObjectIndex": "disabled",
    "DFEQueryEngine": "disabled",
    "ReadWriteConflictDetection": "enabled"
  }
}
If the report isn't showing, this strongly suggests your device is not able to reach your Amazon Neptune cluster, and you should focus on investigating why that is.
Azure Cosmos DB Configuration Fields
When specifying your Gremlin Database Variant as Azure Cosmos DB or Azure Cosmos DB Emulator, the following additional fields will be available:
- Azure Cosmos DB Auth Key: Your Azure Cosmos DB Primary Key as shown on your account under Settings - Keys.
- Azure Cosmos DB Database Name: The Database ID of your Azure Cosmos DB account
- Azure Cosmos DB Collection Name: The Collection Name of your graph
Kerberos Authentication Configuration Fields
If your Graph Database requires Kerberos Authentication, you can configure G.V() to use the "GSSAPI" SASL mechanism to fulfill this authentication requirement, as documented on the official Apache TinkerPop documentation. There are 4 main components that you need to address in order to use Kerberos configuration in G.V(), in line with standard requirements for Java based Kerberos authentication, which we describe below:
- Access to a valid krb5.conf configuration file: G.V() will attempt to fetch your krb5.conf file from two separate locations, in order. First, from the java.security.krb5.conf Java Environment Variable, and if not found, from the KRB5_CONF environment variable. If neither are set, you will be prompted to set the java.security.krb5.conf Java Environment Variable for G.V().
- Access to a valid JAAS Configuration file: G.V() will attempt to fetch your JAAS Configuration file from the java.security.auth.login.config Java Environment Variable. If not found, you will be prompted the set the java.security.auth.login.config Java Environment Variable for G.V().
- A JAAS Entry name value that matches the ones set in the JAAS Configuration file.
- A Kerberos Service name value that matches the one configured on your graph database.
Connection List
Your saved connections will be displaying on the left of your screen, as shown in the screenshot below. You can toggle the connection sidebar by clicking on  at the top left of the screen.
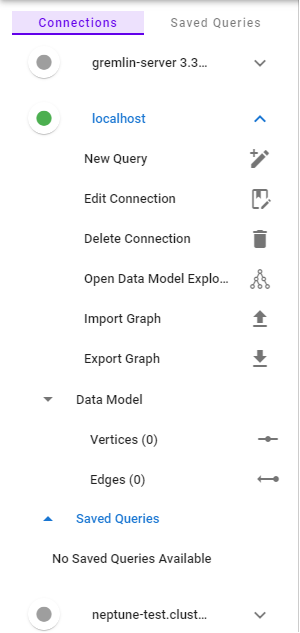
 indicates that the server is available and reachable by G.V(). Connection is automatically attempted when opening the Connection Menu Item, or when a query editor is open for the connection.
 indicates that the server is either not available and reachable by G.V(), or that G.V() hasn't yet attempted to connect to it. You can attempt to connect to the server by clicking on the inactive indicator, opening a query editor or opening the Connection Menu Item. Failure to connect will be indicated by an error message displaying to the top right of the screen.
The following actions are available:
- New Query: This will open a Query Editor tab from which you can write and test out your queries. More information is available at Query Editor
- View Database Features: This will open the View Database Features screen described below
- View Connection Metadata: (Amazon Neptune Only): Displays information about your Amazon Neptune database as displayed under the /status endpoint.
- View Graph Summary: (Amazon Neptune Engine 1.2.1.0 above and Aerospike Graph only): Displays Graph Summary information from your Graph Database based on their Graph Summary API.
- View Slow Query Logs: (Amazon Neptune Engine 1.2.1.0 above Only): A display of your Amazon Neptune database's slow query logs with one-click profile, explain and run controls to quickly troubleshoot your slow queries leveraging the Amazon Neptune Explain and Profile APIs. Read Amazon Neptune Slow Query Logs View for more details.
- View Audit Logs: (Amazon Neptune Only): A display of your Amazon Neptune database's Gremlin query audit logs with one-click profile, explain and run controls to quickly investigate and troubleshoot queries run on your database, leveraging the Amazon Neptune Explain and Profile APIs. Read Amazon Neptune Audit Logs View for more details.
- Edit Connection: This will open the Edit Connection screen described above.
- Delete Connection: This will prompt you to delete the connection. Note that deleting a connection will also deleted any saved queries under the connection.
- Graph Data Explorer: This will open a Graph Data Explorer tab where you can query your database using manual filters. More information is available at Graph Data Explorer
- Open Data Model Explorer: This will open a Data Model Explorer tab from where you can visualise the structure of your graph database schema.
- Import Graph: This will import a graph file of your choice (.graphml, .xml, .json, etc) into your database. Note that this feature is only available for servers accessible over localhost at the moment. Importing of graph data for remote graph instances is not currently available.
- Export Graph: This will export your graph data to a graph file format of your choice (.graphml, .xml, .json, etc). Note that this feature is only available for servers accessible over localhost at the moment. Exporting of graph data for remote graph instances is not currently available.
- Data Model: A list of available edges, vertices and their relevant properties are displayed as a tree view under this section and can be navigated by clicking on the various elements. You will also be able to manage stylesheets for your elements to modify the display within the graph results visualisation. More information is available at Stylesheet Management
- Saved Queries: A list view of your saved queries, which you can launch/delete from within the list. For more information on query management, see Save a Query
- View Query History: To view previous queries run in for your connection, click on
 . The query history view allows to to navigate previously ran queries.
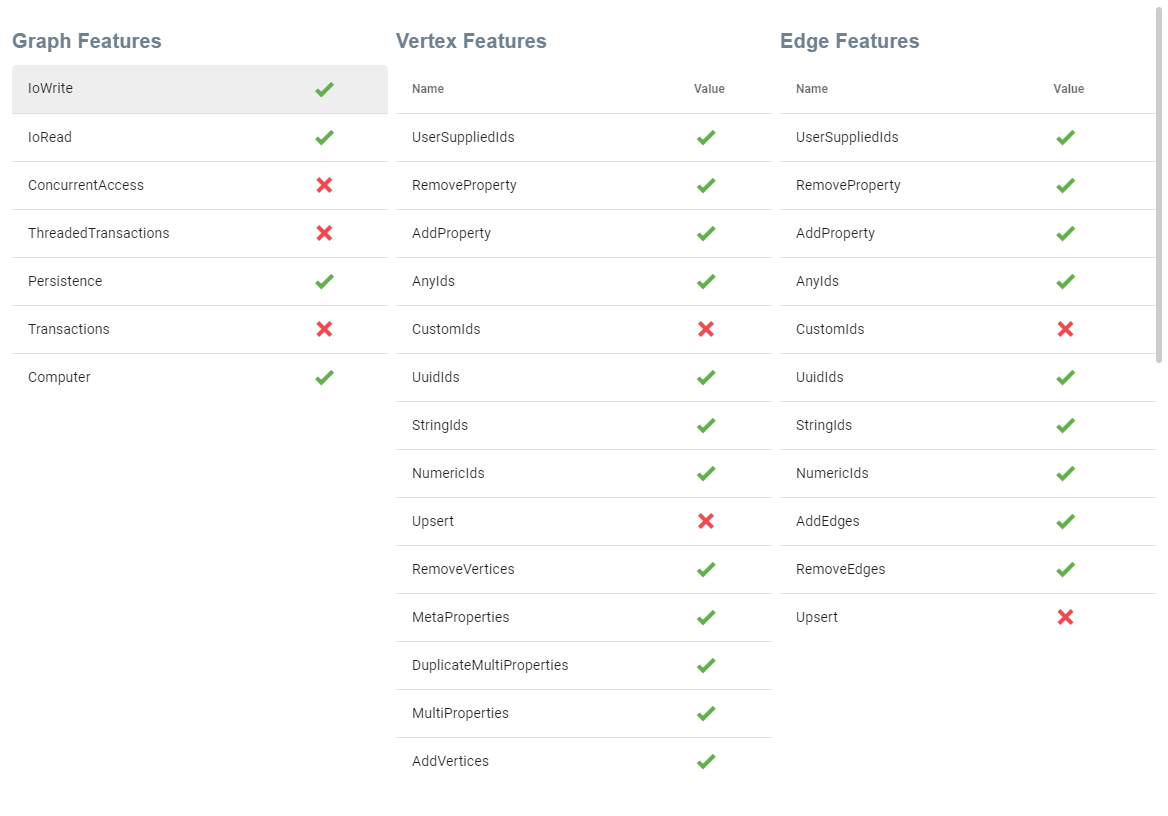
View Database Features
The View Database Features displays your Gremlin Server's features as output by the graph.features() (excluding VariableFeatures) and will display the following:
- Graph Features
- Vertex Features
- Edge Features
- Vertex Property Features
- Edge Property Features
See below a sample display of Database Features from G.V():
Data Model Management
G.V() will attempt to load a "data model" (or "schema") for your graph database which consists of all known labels for edges and vertices as well as properties found on them. The data model specifically consists of the following:
- A list of vertex labels
- For each vertex label, a list of found properties and the type of the property (e.g. int, string, etc)
- A list of edges defined by their label, in vertex label and out vertex label
- For each edge, a list of found properties and the type of the property (e.g. int, string, etc)
Data model loading is an essential aspect of G.V() which influences many of the features of the application, such as the ability to suggest property keys, vertex/edge labels, etc whilst writing queries, the generation of stylesheets for the graph display, and many more.
Data Model Loading Options
- Bulk (Remote): Bulk data model loading performs a scan of your graph database to discover vertex labels, edge labels and their properties using a set of global graph scan queries, hence the name. This is best suited for small and medium graphs (less than 1m elements) with many different vertex and edge labels. For performance reasons this method will not scan the entirety of your graph but a sample of each identified labels (1000 elements per label) to discover available properties.
- Step By Step (Remote): Step by step data model loading performs an initial scan of your graph database to discover vertex and edge labels, then performs further scans for each identified labels to map properties to them. This is best suited for small and medium graphs (less than 1m elements) with few different vertex and edge labels. For performance reasons this method will not scan the entirety of your graph but a sample of each identified labels (1000 elements per label) to discover available properties.
- Data Discovery (Local): No proactive scan of your graph database will be performed to understand the structure of its data. Instead, as you query your graph via G.V(), a data model will be built based on the fetched data. This is best suited to medium to large graphs (more than 1m elements) and ensures maximum performance at the cost of accuracy.
TIP
The graph size thresholds presented above to decide on which Data Model Loading Option to pick depend largely on the CPU/Memory resources powering your graph database. If your graph database can routinely perform queries handling millions of elements then you can attempt a Bulk data model load. Conversely, if your graph database has very little infrastructure behind it, even with fewer elements, you may want to choose Data Discovery instead.
TIP
Here are some queries you can run on your graph to sample the data (relatively) quickly and efficiently when using the Data Discovery loading option:
Discover all vertex labels and all of their properties (assuming all vertices have consistent properties)
g.V().limit(200000).group().by(label()).by(limit(1))g.E().limit(200000).group().by(label()).by(limit(1))Remote Data Model Loading
By default, the data model will attempt to keep itself up to date automatically as you update your graph database from G.V(). The data model will be loaded on initial connection to your database, but can also be pro-actively reloaded by clicking on from the Connection List sidebar, for instance if you modify your graph database structure from a separate Gremlin Console. There is currently no explicit support for JanusGraph nor DataStax Enterprise Graph's data model API, though this is a planned feature.
WARNING
Remote Data Model Loading relies on your graph database being capable of returning results to certain complex queries in reasonable amount of time (< 5-10 minutes) and may be unsuitable for very large graphs. Should G.V() be uncapable of constructing the Data Model by querying your database, it will instead fall back to Local Data Model Construction
A Complex Data Model Loaded Displayed by G.V(): 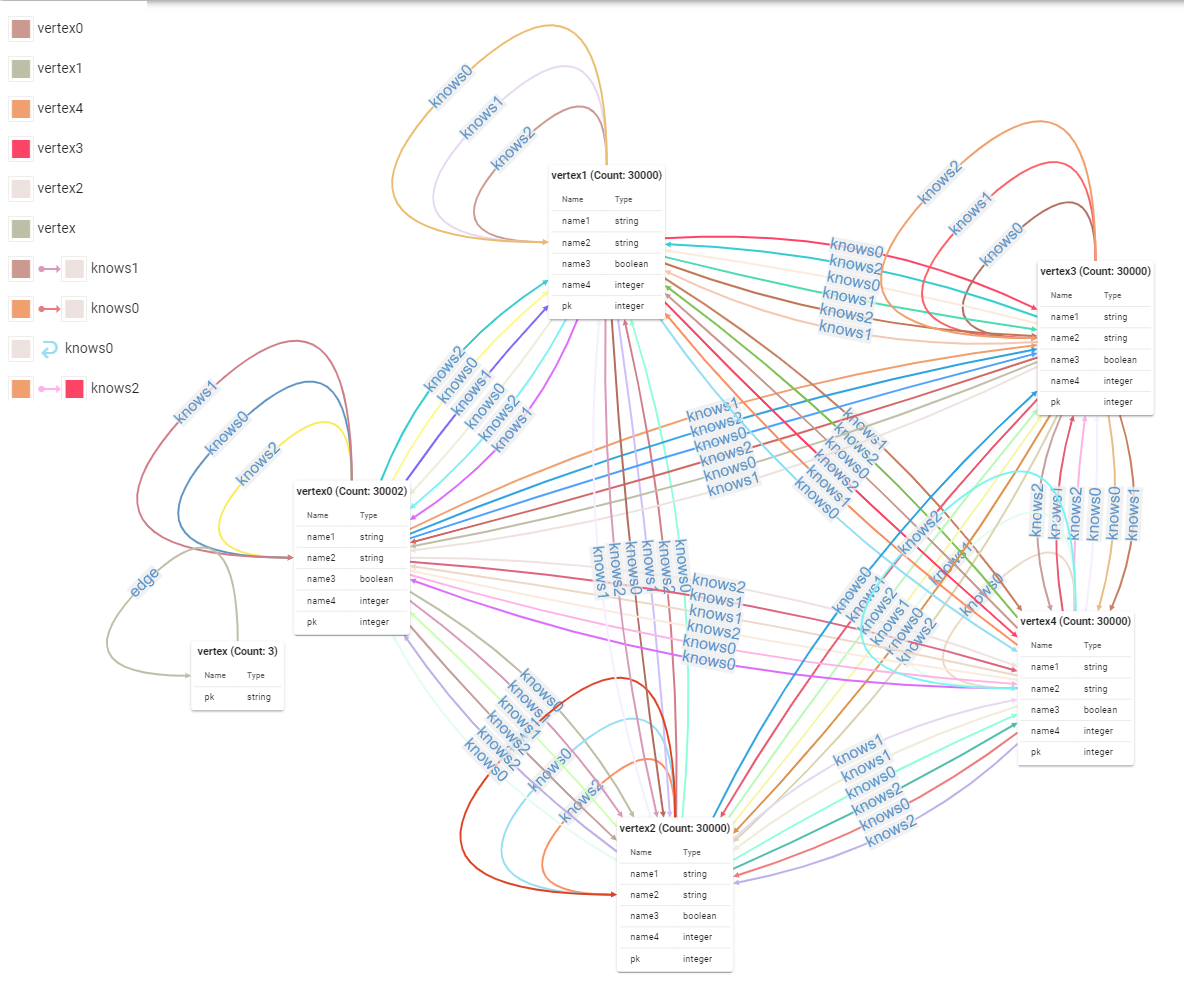
A Note on Remote Data Model Loading for JanusGraph
If your JanusGraph instance is configured to enforce a default schema (via the schema.default setting), G.V() will rely instead on the Schema Management API to load the data model, regardless of the data model loading method chosen. It's a considerably faster and more accurate way to construct the data model and we encourage enforcing a default schema on your database where practical, particularly for larger graphs.
A Note on Remote Data Model Loading for Azure Cosmos DB
The Azure Cosmos DB storage structure and Gremlin API function slightly differently. G.V() constructs the remote data model using the SQL API for performance reasons as it severely reduces the Read Units consumed in the process. This is particularly important for accounts configured with provisioned throughput as there may be limits to the complexity of queries your database will tolerate. The SQL API limits G.V()'s ability edge/vertex properties and relies on a sampling model whereby we load a small set of elements and determine the available properties for a given element based on that sample. G.V() is configured with an element sample size of 1000 elements. Should your database have properties that are not found reliably and every vertex/edge as defined in the Data Model Management section, there is a chance that it may report inaccurately the properties available on your element.
TIP
The above only applies to the cloud version of Azure Cosmos DB, not the emulator.
Local Data Model Construction
For performance reason, G.V() will keep a local cache of your graph's schema. This local cache can be constructed in two ways:
- By performing a Remote Data Model Loading
- In the event of the above failing, G.V() will construct the data model progressively as vertices and edges are fetched via queries you run on G.V(). This is referred to as an incomplete data model
If your data model is loaded locally only, it will display a specific message on the Data Model Editor stating its local state, indicating that it may not be fully accurate to the entirety of the data available in your graph
Create a Graph Playground
To create a Graph Playground, click on the + icon at the bottom left of the screen then select "Add A Graph Playground" or on the Getting Started tab, click on "Add New Graph Playground". A graph playground will allow you to run queries against a Gremlin Server running on v3.6.0 without the need to configure your own server. The data created on your graph playground will be persisting and can be imported/exported. The playground is best suited for learning or testing on a specific dataset.
You can optionally specify a graph import file in a suitable format to be loaded into the Playground by clicking on "Import your own data (GraphML, GEXF or GraphSON)", or select one of the preset graph imports available directly in G.V(). G.V() currently supports the following import format:
- GraphSON
- GraphML
- GEXF
WARNING
G.V() doesn't support the Kryo format. If your export is using the Kryo format, please convert it to GraphSON or GraphML.
WARNING
The Graph Playground runs an in-memory graph, it's therefore not intended for use with large quantities of elements.
WARNING
The G.V() GEXF import feature currently does not support labeling of vertices and edges, therefore all imported vertices/edges will be labeled respectively as "vertex" and "edge". In the future, additional functionality will be added to provide more options on GEXF import.
Expose a G.V() Playground on localhost port
You can optionally expose your G.V() Playground over a localhost port, effectively turning it into a Gremlin Server. To do so, edit your playground and enable the Expose Playground on localhost port option. You'll then be prompted to enter a port number to expose your G.V() Playground over. The exposed G.V() Playground will behave in every way like a regular Gremlin Server would. It supports GraphBinaryV1 and GraphSONV3 serialization, and can be connected over websocket on the port you specified. Below is a sample Gremlin console remote configuration file to connect to a G.V() Playground running over port 9182:
hosts: [localhost]
port: 9182
serializer: { className: org.apache.tinkerpop.gremlin.util.ser.GraphBinaryMessageSerializerV1, config: { serializeResultToString: true }}
WARNING
The G.V() Playground operates as an in-memory graph. One resulting constraint is the graph is not written to its resilient file storage until the corresponding Gremlin Server is successfully shut down. When exiting G.V(), our software will attempt to gracefull exit each opened Gremlin Server or TinkerGraph. Note however that in the event of an unexpected shutdown changes made to your graph during your active G.V() session could be lost.
TIP
Each G.V() Playground exposed over a localhost port must have a different port configured